Universal Biometric API 3.0 (WebAPI 3.0)
- Our Biometric Web API 3.0 is designed to enable seamless integration of biometric time, attendance, and access control machines with websites and other web applications.
- With powerful REST APIs and Callback APIs, the API allows for efficient communication between biometric machines and your server application.
-
It supports a range of inputs, including :
- Fingerprint,
- Face,
- Card,
- Palm,
- Vein,
- Retina,
- Body Temperature,
- Password, making it a versatile solution for all your biometric needs.
- The Biometric Device to Web Application Communication Architecture allows you to connect biometric time and attendance devices from anywhere in the world to your web application.
- This means you can track attendance and manage users in real-time as long as the devices are connected to the internet. Communication happens over HTTP, and there's no need to install any software on the local network to make it work.
- The API is compatible not only with Cams biometric machines but also with ZKTeco machines and other models. Please refer to the Supported Brand List for information on additional machine support. This API is known as the Push SDK for ZKTeco machines.
- MUST READ: By referring to this documentation, you will be able to:
- Receive real-time attendance data from biometric devices to your server
- Remotely add or delete users on biometric devices from your server application
- Preserve users' biometric data and utilize it to add them to any biometric device at any time
- Enroll users in biometric devices, complete with user photos, without requiring their physical presence at the device
- Authorize user access on the biometric device through the business logic in your server application
- Assign time-bound access to users on biometric devices and restrict usage outside the specified duration
- Synchronize biometric data across multiple devices located in different parts of the country or world
Protocol Engine Top Level Design

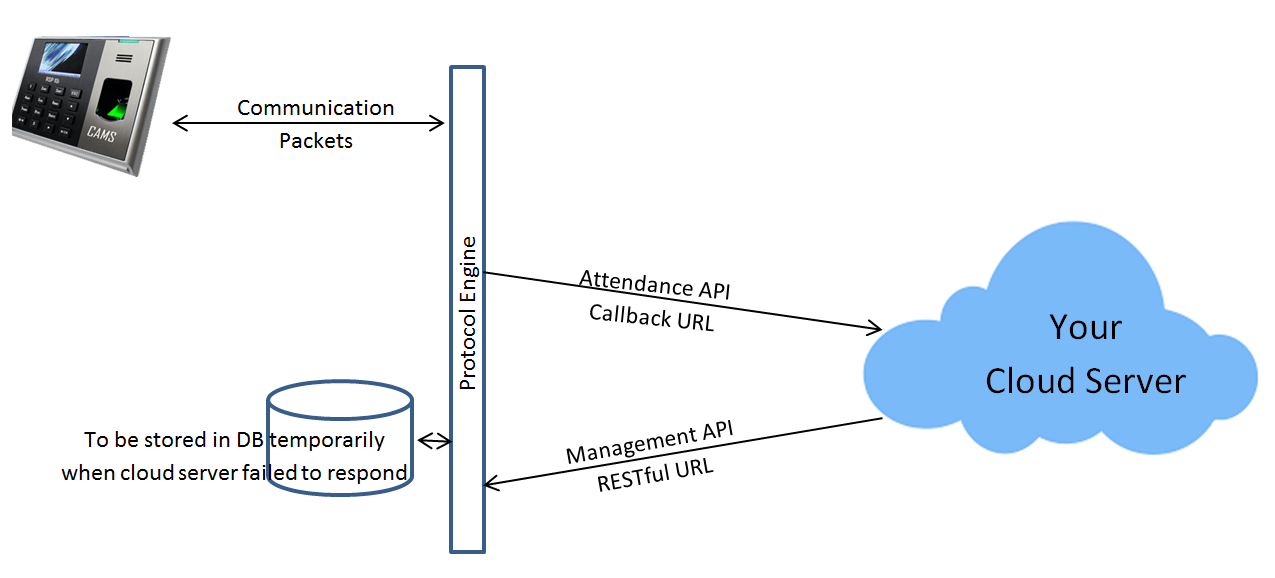
- The Cams Biometric Web API Communication Architecture is made up of a top-level diagram that shows how biometric devices can be connected to the Cams Protocol Engine through the internet from anywhere in the world.
- The Protocol Engine is hosted on the Cams Data Server, but a Lite version of the Protocol Engine can also be hosted on your server. This engine is responsible for managing data flow between Cloud systems and biometric devices.
- If the Cloud server or biometric device is not available or fails to respond, the Engine will maintain attendance data.
- As soon as the respective systems start running again, the data will be updated and previous data will be wiped out.
Simple Integration
Receiving real-time attendance data from a biometric device to your server is easy with the Cams Biometric Web API. With Simple Steps:
Step 1
Expose a URL from your server and map it to the device using the API
Monitor.
(Note :The URL should handle incoming parameters such as user ID, attendance time, device
ID, and other
relevant data. You can refer to the Sample Request
Formats for
different operations available on the website. To record real-time attendance, you can
also use the sample php
program provided at
the bottom of the page.)
Step 2
Once the URL is mapped, you can start marking attendance on the biometric device, and your server will receive the real-time attendance data automatically.
ADDITIONALY
To manage users on a biometric device, you can use the Cams RESTful API. This API will be provided to you upon purchase and handles operations like adding, deleting, and managing users on the device.
URL Types
- CallBack API is used for real-time communication from the device to your server. To use this API, you must expose a URL on your server that the device can call back to. There is no time latency with this API
- RESTful API is used for communication from your server to the device. To use this API, you must call the RESTful URL that has been exposed by Cams. The time latency for this API is 15 seconds and it can go up, based on the number of calls and amount data sent in previous calls.
API Monitor
This allows you to configure settings such as CallBack URL, Security Key, and Auth Token for each device connected to your server. After purchasing Cams Biometric services, you will be given a login to the API Monitor.
Using the API Monitor, you can monitor real-time attendance logs as they are transferred from the biometric device to your server. In addition, the tool offers the functionality to bulk upload (through excel) or delete users in the device, resend attendance data from the device, and perform other monitoring activities.
Overall, the API Monitor provides an efficient and user-friendly way to manage your biometric devices and their associated data.
Request Data Format
Each request requires passing two parameters: one as POST PARAM and the other as stream data.
- The service tag ID of the device must be passed in the query string with the parameter name "stgid".
- The parameter for raw/stream data does not require a parameter name to pass data.
The following is the format for the raw/stream data that all requests must adhere to.
- CommandName: specifies the requested operation, such as RealTime, Add, Delete, Load, Resend, and more.
- CommandEntity: specifies the object of the requested operation(CommandName), such as User, Template, Photo, and more
- OpeartionData: contains the data required to perform the requested operation. The structure f this data varies based on the CommandName and CommandEntity
- AuthToken: a token configured in the API Monitor for each device. This token can be used to authenticate the request
- OperationID: a unique alphanumeric ID sent with each API call. Its length varies from 10 to 15 characters. This ID is important to share with the support team when working on any API-related issues, and it can be left empty.
Response Data Format
Response : Your server must return the following response for all requests received, even if there is a business or data validation failure.Failure to return the expected response will result in the same request being sent to your server repeatedly:
API Command List
Command Data Structure Description Receive Real Time Attendance
- UserID: Employee id or user id of the user.
- LogTime: Attendance time in "YYYY-MM-DD HH:mm:SS GMT +TZ" format. Eg: 2020-09-17 11:09:09 GMT +0530
- Type: Indicates the type of attendance. Possible values are: CheckOut, CheckIn, BreakOut, BreakIn, OverTimeIn, OverTimeOut, MealIn, MealOut
- InputeType: Indicates what input was used for recording the attendance. Possible values are: Fingerprint, Face, Password, Card, Palm, FingerVein, Iris, Retina, and Palm.
- Temperature: Temperature data of the user as measured during the attendance/punch.
- FaceMask: Indicates whether the user wore a mask or not while their face was detected.
- Temperature and FaceMask may not appear in the request object if the hardware doesn't support it.
- If the machine is capable of recording photo at the time of record a punch and transffering the same photos to the server is part of extened API at addtional cost.
Add User
- UserID: Employee id or user id of the user.
- FirstName: Self-explanatory
- LastName: Self-explanatory
- UserType: Values: User, Administrator
Add user with Template(s)
Every template should be in array of a struture, even if there is only one template is being passed.
- Type: Values are: Fingerprint, Palm, Face, Card, Password, Fingervein, Iris, Retina
- UserId: user id whom the template belongs to
- Data: Template data
- Size: Size of the template
- Index: Index of fingerprint/face. Keep it zero, if not sure about the index value
Add User Photo
- Type: Supported value is Base64
- Data: png/jpeg photo content in Base64 format
Manually user added in the device
This data would be posted to your server when user is added/updated with name, password and card in single step. Template[]: Array of template information of Card and/or Password.
Manually template added/updated in the device
Not all the templated be posted as a single object. You will have to take care of integrating them into single object and store in your database. Face may have 10-15 templates. So your call back url shall be posted 10-15 times for every single face registered. Similarly for every fingerprint,card, password, palm will have each one service call. The size of the templates may varry from 1k to 20k
Delete User
Delete All Users
Delete all the users registered in the biometric device
Load Punchlog
Load all the punch logs between the given dates. The default offset should be zero. If the result set exceeds 50 records, only retrieve 50 records and provide an offset value. Use the provided offset to fetch the next set of 50 data. The date format for StartTime and EndTime should be YYYY-MM-DD HH:mm:SS GMT TZ, for example, 2020-09-17 16:55:15 GMT +0530. You can only retrieve data from the last 30 days. Therefore, ensure that the data is pulled and stored on your server before the expiry time. It is disabled by default while callback url for realtime communication is configured. Also, It is recommended to not implement this without discussing with our technical team. This feature is not recommended for ERP integration without prior consultation. Please consult with our technical team to determine if the use of this feature is absolutely necessary before proceeding.
Response of RESTful API
Following will be the response of your RESTful calls.
Status will be done and StatusCode will be 0 for successful calls. The list of possible StatusCodes are:
- done = 0
- API_RESPONSE_INVALID_REQUEST_DATA = 1
- API_RESPONSE_INVALID_SERVICE_TAG_ID = 2
- API_RESPONSE_INVALID_ORIGIN_IP = 3
- API_RESPONSE_INVALID_ENCRYPTION = 4
- API_RESPONSE_INVALID_SUBSCRIPTION = 5
- API_RESPONSE_INVALID_OPERATION = 6
- API_RESPONSE_INVALID_AUTHTOKEN = 7
- API_RESPONSE_INVALID_OPERATION_TYPE = 8
- API_RESPONSE_INVALID_START_TIME = 9
- API_RESPONSE_INVALID_USERID = 10
- API_RESPONSE_INVALID_API_CONFIGURATION = 11
- API_RESPONSE_INVALID_SECURITY_KEY = 13
- API_RESPONSE_INVALID_TEMPLATE = 15
- API_RESPONSE_UNKNOWN_ERROR = 999
Lazy Response of RESTful API
Your CallBack API shall be called whenever the response comes device as per your request (such as AddUser, DeleteUser, etc.)
Ports supported
- To receive real-time attendance information from your biometric device, you need to bind your callback URL to port 80 and expose an HTTP URL from your server.
- This URL should be configured in the API Monitor, which will automatically call the URL whenever a punch is registered in the device.
- You can then read and manage the attendance records in your database based on your business logic.
- During testing, if you need a non-standard HTTP port, you can temporarily use port 8123.
- If you prefer to use an HTTPS URL with its standard port, make sure your SSL certificate doesn't require server restarts.
Sample Biometric API Request and Response
Sample data for all the operations are listed at
Sample Data
Encryption
You can configure an AES-256 Encryption Key as a security key in the API Monitor login. If this key is set up, all the raw data parameters transferred between the Cams and your server will be encrypted using this key. Here is a Java example for encrypting and decrypting data:
    private String encrypt(String data, String key)
    {
        SecretKeySpec secretKey = getKey( key );
        Cipher cipher = Cipher.getInstance("AES/ECB/PKCS5PADDING");
        cipher.init(Cipher.ENCRYPT_MODE, secretKey);
        return Base64.encodeBase64String(cipher.doFinal(data.getBytes("UTF-8")));
    }

    private String decrypt(String data, String key)
    {
        SecretKeySpec secretKey = getKey( key );
        Cipher cipher = Cipher.getInstance("AES/ECB/PKCS5PADDING");
        cipher.init(Cipher.DECRYPT_MODE, secretKey);
        return new String(cipher.doFinal(Base64.decodeBase64(data)));
    }
Biometric Attendance SDK for Connecting to Web Application
You need an SDK for your fingerprint attendance system?
It's important to first understand what an SDK is:
- A set of development tools or programs needed to perform specific operations, with the SDK code becoming part of the main application once it's developed.
- However, for Cams systems, an SDK isn't necessary, as all operations can be executed using the CallBack URL and RESTful URLs provided.
- Therefore, if you're looking to integrate your biometric machine with web-based software or portals such as OpenERP, ERPNext, HRAPP, Zoho, SAP, Tally, and others, all you need is an API
However, if you're interested in developing a Windows-based desktop application for interacting with the biometric device, we offer an SDK that you can avail.
How does communication between machine and your web application happen?
- The communication between Cams Machines and your web application is facilitated through the Cams DataServer, which serves as a tightly coupled intermediary.
- Attendance information captured by the machine is transmitted to your server via the DataServer.
- The addition or removal of users from the machine is initiated by invoking the APIs that are exposed by the DataServer.
- The DataServer then communicates with the machine and subsequently relays the response back to your server, ensuring a seamless integration and exchange of data between the machine and your web application.
Punches that are logged when the device is online will be transmitted to your server in real-time. In the case of offline punches, they will be transmitted to your server sequentially as soon as the device comes back online. The sequence of the data transmitted may vary between devices. As such, it is imperative that the business logic is developed with the understanding that older punch data may be received after newer punch data.
Do you wish to receive data without passing it through Cams Dataserver?
Certainly. We offer a protocol engine in its lite version that must be installed on your server (Windows/Linux/Unix).
- Upon installation, your web API endpoints will be triggered automatically upon registration of attendance at the device.
- However, please note that activation costs and yearly license fees remians same
- This scenario is also relevant in situations where the entire system is intended to operate on a LAN network with no internet connectivity.
List of Protocol Engines
- If you are using Cams RSP1x series devices or Cams R2x series devices then you have to buy 1x/2x protocol Engine .
- If you are using 3rd party biometric devices such ash ZkTeco, eSSL, BioMax, Identix and etc, then you have to buy ZkTeco API Engine.
- If you are using Cams 3x series devices then you have to buy 3x protocol Engine.
Protocol engine cost varries from USD 500 to USD 10,000 based on the Model and quantity of the order.
Non-Server web application
If your server application is confined to a local computer that is not accessible through public IP/domain, you can utilize the LoadLog API to retrieve attendance logs for a specific timeframe, as long as the device is connected to the internet.
Design constraints for cloud-based biometric attendance software
- Offline Punch: The software should be capable of accommodating punches from biometric machines when they are offline. It must have the flexibility to update the attendance status of users for past dates based on the offline data that arrives when the machine comes online. This requires a mechanism to reconcile offline data with existing records.
- Duplicate Punch: The software should be equipped with logic to ignore duplicate punch data. When punch data for the same user from the same machine with the same attendance time is received again, it should be ignored
- Punch from Multiple Machines: In environments with multiple biometric machines where employees can record punches on different devices, it's common for the earlier punch to be recorded offline. Subsequently, the data may arrive after receiving the later punch from an online machine. To resolve this, it's critical to implement sorting logic that organizes all punches within a day before determining the IN/OUT times
By addressing these design constraints, the cloud-based biometric attendance software can ensure the accurate and reliable tracking of attendance.
Web API supported Biometric machines
You can find a comprehensive list of biometric machines that support various web APIs on our website at camsunit.com.
These machines provide support for a range of authentication methods including Fingerprint, Palm, Face Recognition, card (LHF, UHF, QR Code) and password, ensuring flexibility in choosing the right device for your business needs.
Cost of API
The cost of our API for Cams Biometric machines includes both API activation and license fees, which are essential for optimal device functionality. The API license is valid for one year and must be renewed annually. Each biometric machine purchase requires a corresponding API activation and license in the first year. From the second year onward, only the license renewal fee is applicable, which should be completed before the license expiration to avoid additional reactivation costs.
For third-party machines, a protocol update fee is also required, in addition to the API activation and license fees. Protocol updates are possible only for devices that are validated by our CAMS bot at https://developer.camsunit.com. This bot checks if the third-party device can be supported by our API. For more detailed information on this process, please refer to our online documentation online documentation
| Service | USD | INR |
|---|---|---|
| API Activation | 120 - 300 | 5750 - 15000 |
| Yearly API License | 60 - 120 | 3000 - 6000 |
| Protocol Update for non-Cams (eSSL, ZkTeco, BioMax, Identix and more)
devices. Should be verified at https://developer.camsunit.com. For more information refer here |
150 - 300 | 8000 - 15000 |
| Hardware Cost of Cams Biometrics Machines Refer product page: https://camsunit.com/product/home.html. |
180 - 720 | 9000 - 60000 |
FAQ
Frequently Asked Questions Related to Biometric API Integration.
How To Integrate Biometric Attendance Device with your Own Server - Demo with PHP program
PS: The video gives the idea about how to integrate the biometric device. For the typical data format of request and respone, please follow this documentation
PHP Program to receive the real-time biometric attendance data
Download the sample PHP file from Download Here! to connect with the biometric machine. If you want to test? or if you want to know how to connect the Cams biometric or fingerprint attendance machine with your website?, just place this downloaded file at you server and configure the URL at API monitor
Now whenever an attendance is registered in the machine, you can see cams-attendance-record.txt gets generated in the same location where you have placed the PHP file, and the same file will be updated with real time attendance data. Now you can update this code to store in your own DB. You need to make sure that your machine is connected to the online for receiving real-time attendance. Following is the code snippet for your quick reference
    $rawdata = file_get_contents("php://input");
    $stgid= $_GET["stgid"];

    // We capture all the incoming data from Cams into file: cams-attendance-record.txt.
    // If you need to maintain it in your own database, you need to impletement the same here.

    $raw = json_decode($rawdata);
    $ret = "done";
    $data = json_decode($rawdata, true);

    if( isset( $data["RealTime"] ))
    {
        $ret = handle_attendance_log($stgid, $rawdata);
    }
    else
        $ret = "Else";

    $response = new StdClass();
    $response->status="done";
    header("Content-Type: application/text;charset=utf-8");
    http_response_code(200);
    echo json_encode($response);

    function handle_attendance_log($request_data)
    {
        $ret = "done";
        // Sample rawdata
        // {
        //      "RealTime": {
        //           "OperationID": "123123123",
        //           "PunchLog": {
        //                "Type": "CheckOut",
        //                "Temperature": "36.8",
        //                "FaceMask": false,
        //                "InputType": "Fingerprint",
        //                "UserId": "2",
        //                "LogTime": "2020-09-17 07:48:22 GMT +0530"
        //           },
        //           "AuthToken": "COJJ7eiiPBGUfmIQPvh2PJWWDLX7OuKs",
        //           "Time": "2020-09-17 04:19:03 GMT +0000"
        //      }
        // }

        $request = new StdClass();
        $request->RealTime = new StdClass();
        $request->RealTime->AuthToken="";
        $request->RealTime->Time="";
        $request->RealTime->OperationID="";
        $request->RealTime->PunchLog = new StdClass();
        $request->RealTime->PunchLog->UserId="";
        $request->RealTime->PunchLog->LogTime="";
        $request->RealTime->PunchLog->Temperature="";
        $request->RealTime->PunchLog->FaceMask="";
        $request->RealTime->PunchLog->InputType="";
        $request->RealTime->PunchLog->Type= "";

        $request = json_decode($rawdata);

        $content = 'ServiceTagId:' . $stgid . ",\t";
        $content = $content . 'UserId:' . $request->RealTime->PunchLog->UserId . ",\t";
        $content = $content . 'AttendanceTime:' . $request->RealTime->PunchLog->LogTime . ",\t";
        $content = $content . 'AttendanceType:' . $request->RealTime->PunchLog->Type . ",\t";
        $content = $content . 'InputType:' . $request->RealTime->PunchLog->InputType . ",\t";
        $content = $content . 'Operation: RealTime->PunchLog' . ",\t";
        $content = $content . 'AuthToken:' . $request->RealTime->AuthToken . "\n";

        $file = fopen("cams-attendance-record.txt","a");
        fwrite($file, $content);
    }
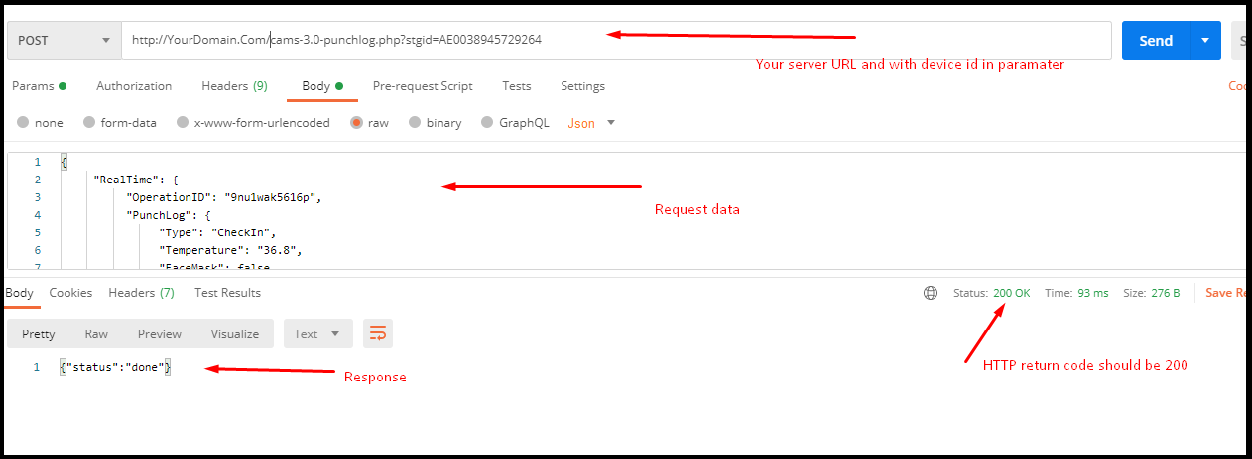
URL Testing
Ensurethat your
URL is tested using
any 3rd part tool and response is returned as expected. Following is the screenshot taken
from Postman for your
reference.

Contact Us
Write sales@camsunit.com for availing the APIs support for Cams Machines or WhatsApp to +91-98-409-21006 for technical queries.


